xarray处理气象数据

Python

This article was last updated on <span id="expire-date"></span> days ago, the information described in the article may be outdated.

最近做课程论文需要读取气象数据 (nc格式),之前处理雷达数据时一直都是用 netCDF4 直接梭哈,但是处理全球大尺度的数据时,经常搞日平均月平均,单独取某些月做操作,这个时候 netCDF 就不够看了。正好学一学 xarray,水几篇博客。

读取 netCDF 文件

读取文件部分没什么好说的,直接读取就可以

1
2
3
4
5
from xarray import open_dataset

filename = '1979-2021-monthly-average-SST.nc'
dataset = open_dataset(filename)
print(dataset)
1
2
3
4
5
6
7
8
9
10
11
<xarray.Dataset>
Dimensions: (longitude: 1440, latitude: 721, time: 516)
Coordinates:
* longitude (longitude) float32 0.0 0.25 0.5 0.75 ... 359.0 359.2 359.5 359.8
* latitude (latitude) float32 90.0 89.75 89.5 89.25 ... -89.5 -89.75 -90.0
* time (time) datetime64[ns] 1979-01-01 1979-02-01 ... 2021-12-01
Data variables:
sst (time, latitude, longitude) float32 ...
Attributes:
Conventions: CF-1.6
history: 2022-10-16 08:00:21 GMT by grib_to_netcdf-2.25.1: /opt/ecmw...

Positional indexing

关于坐标的绑定

这里绑定的意思是,你在 xarrayDataset 或者 DataArray 层面对数据操作时,坐标也随着变化。但是你要是直接取出格点数据进行操作的话,这里的绑定就是无效的。

Dataset 中的 positional indexing

xarrayDataset 中,数据是和坐标 (这里的坐标可以是经纬度、时间等) 绑定的,所以可以直接通过 positional indexing 来取想要的部分的数据,例如提取特定时间或者特定经纬度的数据。下面的例子展示了获取1999年3月1日的数据的方法

1
2
3
# 这里写 “1999-03-01” 是因为与数据坐标里 `time` 维的坐标形式一致。
data = dataset.loc[dict(time="1999-03-01")]
print(data)
1
2
3
4
5
6
7
8
9
10
11
<xarray.Dataset>
Dimensions: (longitude: 1440, latitude: 721)
Coordinates:
* longitude (longitude) float32 0.0 0.25 0.5 0.75 ... 359.0 359.2 359.5 359.8
* latitude (latitude) float32 90.0 89.75 89.5 89.25 ... -89.5 -89.75 -90.0
time datetime64[ns] 1999-03-01
Data variables:
sst (latitude, longitude) float32 ...
Attributes:
Conventions: CF-1.6
history: 2022-10-16 08:00:21 GMT by grib_to_netcdf-2.25.1: /opt/ecmw...

这里传入 loc 的参数实际上是一个字典,所以你也可以这样取数据,效果是一样的

1
2
data = dataset.loc[{"time": "1999-03-01"}]
print(data)

同理,想要取特定时间、特定经纬度的数据就多传入经纬度参数即可,但是要注意必须是数据坐标里存在的经纬度坐标

1
2
3
data = dataset.loc[dict(time="1999-03-01",latitude=0,longitude=0)]
# 或者是
data = dataset.loc[{"time": "1999-03-01", "latitude": 0, "longitude": 0}]

但是如果我们想要的是特定时间范围、经纬度范围的数据呢?只要传入 slice 切片就可以了

1
2
3
4
5
6
7
8
9
10
11
12
13
14
# 利用切片获取特定范围的数据
data = dataset.loc[
dict(
time=slice("1999-01-01", "1999-12-01"),
latitude=slice(90, 0),
longitude=slice(0, 180)
)
]
# 或者是
data = dataset.loc[{
"time": slice("1999-01-01", "1999-12-01"),
"latitude": slice(90, 0),
"longitude": slice(0, 180)
}]
1
2
3
4
5
6
7
8
9
10
11
<xarray.Dataset>
Dimensions: (longitude: 721, latitude: 361, time: 12)
Coordinates:
* longitude (longitude) float32 0.0 0.25 0.5 0.75 ... 179.2 179.5 179.8 180.0
* latitude (latitude) float32 90.0 89.75 89.5 89.25 ... 0.75 0.5 0.25 0.0
* time (time) datetime64[ns] 1999-01-01 1999-02-01 ... 1999-12-01
Data variables:
sst (time, latitude, longitude) float32 ...
Attributes:
Conventions: CF-1.6
history: 2022-10-16 08:00:21 GMT by grib_to_netcdf-2.25.1: /opt/ecmw...
切片的顺序

slice 中第一个数值或字符串代表起始坐标,第二个代表终止坐标,因此需要注意 DatasetDataArray 中坐标的起始和终止顺序。如果取反的话将取不出数据。

DataArray 中的 positional indexing

DataArrayloc 使用方法与 Dataset 类似,但是不同的是不需要传入字典,而是以索引的形式传入。

以下只展示一个运行结果

1
2
3
4
# 获取特定时间:1999-01-01, 特定经纬度:(0, 0) 的数据
data = dataset['sst'].loc["1999-01-01", 0, 0]
# 获取特定时间范围:1999-01-01 至 1999-12-01,特定经纬度范围:lat(90, 0),lon(0, 180)
data = datasst['sst'].loc["1999-01-01":"1999-12-01", 90:0, 0:180]
1
2
3
4
5
6
7
8
9
<xarray.DataArray 'sst' (time: 12, latitude: 361, longitude: 721)>
[3123372 values with dtype=float32]
Coordinates:
* longitude (longitude) float32 0.0 0.25 0.5 0.75 ... 179.2 179.5 179.8 180.0
* latitude (latitude) float32 90.0 89.75 89.5 89.25 ... 0.75 0.5 0.25 0.0
* time (time) datetime64[ns] 1999-01-01 1999-02-01 ... 1999-12-01
Attributes:
units: K
long_name: Sea surface temperature
索引范围

需要注意的是,这里的索引填写顺序要和坐标维度顺序相对应,具体的维度顺序可以查看打印出的 DatasetData variables 一栏。

按照某一维度进行排序

有时候读取到的数据,经度或者纬度 (一般都是纬度) 顺序是从 90 到 -90 的,不太方便画图,需要对其重新排序,数据结构和代码如下

排序前。(为了简洁数据我就省略了)

1
2
3
4
5
6
7
8
9
10
11
<xarray.Dataset>
Dimensions: (longitude: 1440, latitude: 721, time: 516)
Coordinates:
* longitude (longitude) float32 0.0 0.25 0.5 0.75 ... 359.0 359.2 359.5 359.8
* latitude (latitude) float32 90.0 89.75 89.5 89.25 ... -89.5 -89.75 -90.0
* time (time) datetime64[ns] 1979-01-01 1979-02-01 ... 2021-12-01
Data variables:
sst (time, latitude, longitude) float32 ...
Attributes:
Conventions: CF-1.6
history: 2022-10-16 08:00:21 GMT by grib_to_netcdf-2.25.1: /opt/ecmw...
1
2
# 排序代码
dataset = dataset.sortby(dataset['latitude'])
1
2
3
4
5
6
7
8
9
10
11
<xarray.Dataset>
Dimensions: (longitude: 1440, latitude: 721, time: 516)
Coordinates:
* longitude (longitude) float32 0.0 0.25 0.5 0.75 ... 359.0 359.2 359.5 359.8
* latitude (latitude) float32 -90.0 -89.75 -89.5 -89.25 ... 89.5 89.75 90.0
* time (time) datetime64[ns] 1979-01-01 1979-02-01 ... 2021-12-01
Data variables:
sst (time, latitude, longitude) float32 ...
Attributes:
Conventions: CF-1.6
history: 2022-10-16 08:00:21 GMT by grib_to_netcdf-2.25.1: /opt/ecmw...

去除 DataArray 中的 NaN 数据

使用 dropna 函数去掉无效值。函数接受两个参数,一个是 dim,一个是 how,暂不清楚这两个参数的具体意义,dim 似乎可以带任意一个纬度,howany

1
data_array = data_array.dropna(dim='longitude', how='any')

经度坐标的转换

数据里的经度坐标的形式一般有两种,-180 - 180 或者 0 - 360。有时候我们需要从一种形式转换成另外一种形式,我大致在网上搜查了一下,并没有发现简便的方法。以下是具体的步骤,并以以下数据为例,其中为了保证篇幅数据部分已经省略。

1
2
3
4
5
6
<xarray.DataArray 'analysed_sst' (time: 1, lat: 200, lon: 994)>
array()
Coordinates:
* time (time) datetime64[ns] 2022-03-01T12:00:00
* lat (lat) float32 -4.975 -4.925 -4.875 -4.825 ... 4.875 4.925 4.975
* lon (lon) float32 -170.0 -169.9 -169.9 -169.8 ... -120.1 -120.1 -120.0

DataArray 新建 Coordinate

使用 xrarray.where 函数可以为 DataArray 变量添加新的 Coordinate。函数接受三个必须参数,分别如下

1
xarray.where(cond, x, y, keep_attr=None)

cond 一般写作一个使用 <> 的判断式,满足条件 (True) 的位置将使用对应的索引从 x 中获取数据,不满足条件 (False) 的从 y 中获取数据。这样说比较抽象,直接看代码。

1
2
3
4
5
6
import xarray as xr

# 这里第一个参数表示获取所有 lon 坐标小于 0,也就是西经的部分,
# 然后把 data_array['lon'] + 360 中对应位置的数据 (也就是西经的负坐标加360后得到的经度)赋给满足条件的位置
# 不满足条件的位置 (也就是东经的坐标) 原样赋给新的坐标 lon_adjust
data_array['lon_adjust'] = xr.where(data_array['lon'] < 0, data_array['lon'] + 360, data_array['lon'])
1
2
3
4
5
6
7
<xarray.DataArray 'analysed_sst' (time: 1, lat: 200, lon: 994)>
array()
Coordinates:
* time (time) datetime64[ns] 2022-03-01T12:00:00
* lat (lat) float32 -4.975 -4.925 -4.875 -4.825 ... 4.875 4.925 4.975
* lon (lon) float32 -170.0 -169.9 -169.9 ... -120.1 -120.1 -120.0
lon_adjust (lon) float32 190.0 190.1 190.1 190.2 ... 239.9 239.9 240.0

这时可以发现,数据中多了 lon_adjust 坐标,其坐标的经度数就是 lon 中对应的经度在 0-360 中的表示。但是该坐标前面没有 * 号,说明该坐标虽然存在但是却没有在数据中使用。(可以看到第一行数据的三个维度依旧是 time, lat, lon)。

DataArray 交换两个 Coordinate

为了启用坐标 lon_adjust,我们需要交换两个坐标,使用函数 swap_dims 实现。swap_dims 接受一个字典参数,key 值是要替换坐标的名字,value 值是新坐标的名字。

1
data_array = data_array.swap_dims({"lon": "lon_adjust"})
1
2
3
4
5
6
7
<xarray.DataArray 'analysed_sst' (time: 1, lat: 200, lon_adjust: 994)>
array()
Coordinates:
* time (time) datetime64[ns] 2022-03-01T12:00:00
* lat (lat) float32 -4.975 -4.925 -4.875 -4.825 ... 4.875 4.925 4.975
lon (lon_adjust) float32 -170.0 -169.9 -169.9 ... -120.1 -120.0
* lon_adjust (lon_adjust) float32 190.0 190.1 190.1 ... 239.9 239.9 240.0

现在 lon_adjust 坐标已经启用了。接下来两步就是可选的,去掉 lon 坐标和坐标重命名了。

DataArray 去除无用的 Coordinate

DataArrayDataset 略有不同,二者去除坐标的函数不一样,这里暂时仅介绍 DataArray 的。使用 reset_coords 函数去除 lon 坐标。

1
data_array = data_array.reset_coords('lon', drop=True)
1
2
3
4
5
6
<xarray.DataArray 'analysed_sst' (time: 1, lat: 200, lon_adjust: 994)>
array()
Coordinates:
* time (time) datetime64[ns] 2022-03-01T12:00:00
* lat (lat) float32 -4.975 -4.925 -4.875 -4.825 ... 4.875 4.925 4.975
* lon_adjust (lon_adjust) float32 190.0 190.1 190.1 ... 239.9 239.9 240.0

DataArray Coordinate 重命名

使用 rename 函数重命名。

1
data_array = data_array.rename({"lon_adjust": "lon"})
1
2
3
4
5
6
<xarray.DataArray 'analysed_sst' (time: 1, lat: 200, lon: 994)>
array()
Coordinates:
* time (time) datetime64[ns] 2022-03-01T12:00:00
* lat (lat) float32 -4.975 -4.925 -4.875 -4.825 ... 4.875 4.925 4.975
* lon (lon) float32 190.0 190.1 190.1 190.2 ... 239.8 239.9 239.9 240.0

关于 xarray 的奇奇怪怪的 key

今天在使用按照季节取数据的时候,突然对 xarray 的取季节数据的方式很感兴趣。就拿取十二月、一月和二月 (缩写为DJF) 的数据来举例,我搜到的方法是这么取的

1
2
data_array_group = data_array.groupby('time.season').groups
data = data_array[data_array_group['DJF'], :, :]

这里的 groupby 可以将数据进行分组,time.season 即表示,按照季节分组。一般来说,groupby 里带入的字符串应该是某个维度的标签才对,time.season 完全不是一个维度的标签。

另外,也可以通过 time.season 的方式,取出一个叫做 seasonDataArray,大小与数据的时间维一致,只不过对应位置换成了时间所在的季节的缩写。

1
data_array['time.season']

我依稀记得,自定义的类可以通过重写某个内置函数来使得类可以通过 key 取值,短暂查询过后,发现这个函数名字叫做 __getitem__。真相大白了,这说明 xarray__getitem__ 函数中,一定有着相应的处理过程。

关于 __getitem__ 函数

__getitem__ 函数接受一个参数,这个参数可以是整数、字符串、或者切片。在你重写 __getitem__ 函数,对这些参数类型分别予以判断并完成返回值的功能后,你的类就可以通过整数索引、通过字符串 key 或者通过切片取值了

xarray 中的 __getitem__ 函数

image-20221020233513346

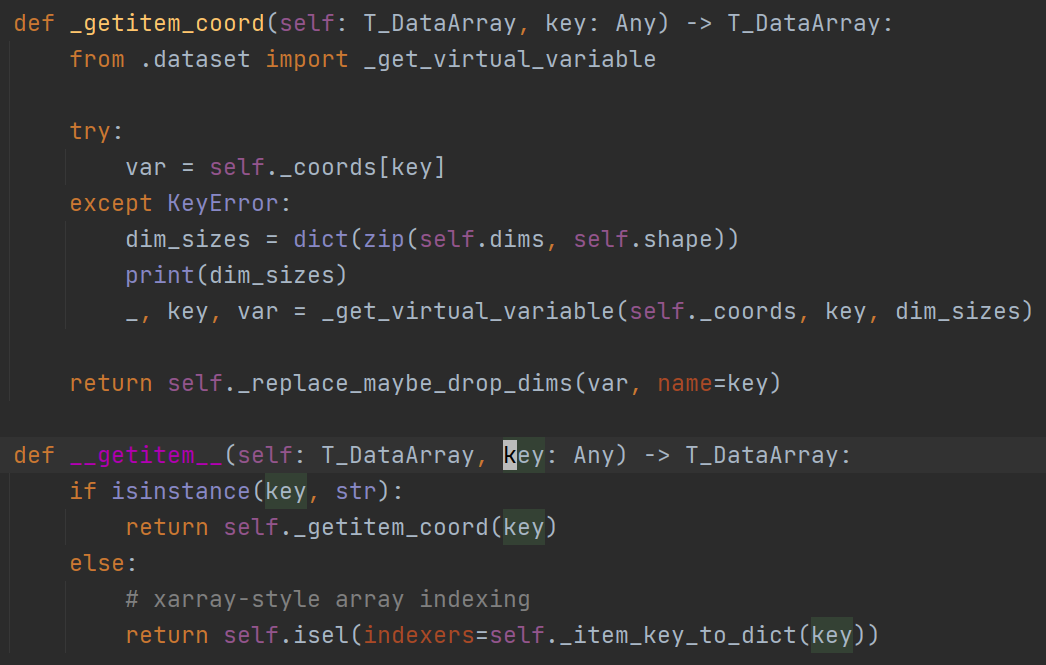
上面是 xarray 的部分代码截图 (请忽略我调试时加上的 print ),可以看到 __getitem__ 函数调用 _getitem_coord 函数取值。若带入的参数是time.season,则 _getitem_coord 在尝试直接取值的过程中将抛出错误,然后调用 _get_virtual_variable 获取不存在的”虚拟值”。

下面是我直接复制来的 _get_virtual_variable 的代码。

1
2
3
4
5
6
7
8
9
10
11
12
13
14
15
16
17
18
19
20
21
22
23
24
25
26
27
28
29
30
31
32
33
34
35
def _get_virtual_variable(
variables, key: Hashable, dim_sizes: Mapping = None
) -> tuple[Hashable, Hashable, Variable]:
"""Get a virtual variable (e.g., 'time.year') from a dict of xarray.Variable
objects (if possible)

"""
from .dataarray import DataArray

if dim_sizes is None:
dim_sizes = {}

if key in dim_sizes:
data = pd.Index(range(dim_sizes[key]), name=key)
variable = IndexVariable((key,), data)
return key, key, variable

if not isinstance(key, str):
raise KeyError(key)

split_key = key.split(".", 1)
if len(split_key) != 2:
raise KeyError(key)

ref_name, var_name = split_key
ref_var = variables[ref_name]

if _contains_datetime_like_objects(ref_var):
ref_var = DataArray(ref_var)
data = getattr(ref_var.dt, var_name).data
else:
data = getattr(ref_var, var_name).data
virtual_var = Variable(ref_var.dims, data)

return ref_name, var_name, virtual_var

主要定位到第 21 行,这里对带入的 key 参数进行了判断,检测是否存在 .,并对其进行了分割,拿到前一部分 time 并用其取出时间值。然后下面的 getattr 将从 ref_var.dt 中取出名叫 season 的属性,然后用 Variable 类生成新的 DataArray 并返回。至此我们终于拿到了想要的 season 时间坐标数据。

但是,等等,有没有觉得这里的 dt 有些眼熟?ref_var 这个变量是从 variables 里取出来的,从上面的图可以看到,variables 就是 self._coords,而 self._coords 存储的就是数据本来的坐标呀。那么我直接通过下面的代码也可以拿到 dt

1
data_array['time'].dt
image-20221020234820713

也就是说,xarray 这些所谓的”虚拟值”,其实都已经算好了,只不过没有在坐标里体现出来而已。那么这个 dt 里究竟有哪些属性,通过 dir 函数打印一下就知道了。另外值得注意的是,这些可取的时间变量类型都是 numpy 的数组,通过这一点我们可以做出更多的操作,详细看下面一节。

1
['__class__', '__class_getitem__', '__delattr__', '__dict__', '__dir__', '__doc__', '__eq__', '__format__', '__ge__', '__getattribute__', '__gt__', '__hash__', '__init__', '__init_subclass__', '__le__', '__lt__', '__module__', '__ne__', '__new__', '__orig_bases__', '__orig_class__', '__parameters__', '__reduce__', '__reduce_ex__', '__repr__', '__setattr__', '__sizeof__', '__slots__', '__str__', '__subclasshook__', '__weakref__', '_date_field', '_is_protocol', '_obj', '_tslib_round_accessor', 'calendar', 'ceil', 'date', 'day', 'dayofweek', 'dayofyear', 'days_in_month', 'daysinmonth', 'floor', 'hour', 'is_leap_year', 'is_month_end', 'is_month_start', 'is_quarter_end', 'is_quarter_start', 'is_year_end', 'is_year_start', 'isocalendar', 'microsecond', 'minute', 'month', 'nanosecond', 'quarter', 'round', 'season', 'second', 'strftime', 'time', 'week', 'weekday', 'weekday_name', 'weekofyear', 'year']

可以看到 xarray 给的很精细,连 microsecond 都有。不过没什么用,我这个是月平均,时间尺度低于月的估计都是相等的。

最后回到最开头,使用 groupby 函数取数据那里。由于时间关系,我这里只做猜测,这里取数据的方式必定是类似的,在内部对 key 值做了判断。

通过 xarray 的 dt 取特定时间的数据

通过上面的分析,可以看出,我们可以直接通过 dt 这个变量来取特定时间的数据。

比如取特定年份的数据

1
data_array = data_array[data_array['time'].dt.year == 2010, :, :]
1
2
3
4
5
6
<xarray.DataArray 'sst' (time: 12, latitude: 41, longitude: 201)>
array()
Coordinates:
* longitude (longitude) float32 190.0 190.2 190.5 190.8 ... 239.5 239.8 240.0
* latitude (latitude) float32 -5.0 -4.75 -4.5 -4.25 ... 4.25 4.5 4.75 5.0
* time (time) datetime64[ns] 2010-01-01 2010-02-01 ... 2010-12-01

既然 dtnumpy 的数组,我们可以利用多条件来筛选数据,例如我要取2008年3月、2009年4月和2010年5月的数据,可以通过下面的操作筛选。

1
2
3
4
5
6
year = data_array['time'].dt.year
month = data_array['time'].dt.month
index = ((year == 2008) & (month == 3)) | \
((year == 2009) & (month == 4)) | \
((year == 2010) & (month == 5))
data_array = data_array[index, :, :]
1
2
3
4
5
6
<xarray.DataArray 'sst' (time: 3, latitude: 41, longitude: 201)>
array()
Coordinates:
* longitude (longitude) float32 190.0 190.2 190.5 190.8 ... 239.5 239.8 240.0
* latitude (latitude) float32 -5.0 -4.75 -4.5 -4.25 ... 4.25 4.5 4.75 5.0
* time (time) datetime64[ns] 2008-03-01 2009-04-01 2010-05-01

不过我感觉应该不会有人会这么取数据吧?

找回丢失的 time 坐标

在使用 groupby 函数进行各种平均、求和的时候 (比如说年平均、月平均之类的),你会发现得到的 DataArray 里面 time 坐标消失了,取而代之的是对应的 year 之类的坐标,这样对稍后要进行的其他操作 (比如直接扔进 eofs 里进行分解) 不太友好,因此还需要手动把 time 坐标添加回来。

这里以 year 坐标举例,其他的坐标应该是类似的

首先我们有 dataset 如下形式

省略了 array() 里的输出

1
2
3
4
5
6
7
8
9
<xarray.DataArray 'sst' (year: 43, latitude: 721, longitude: 1440)>
array()
Coordinates:
* longitude (longitude) float32 0.0 0.25 0.5 0.75 ... 359.0 359.2 359.5 359.8
* latitude (latitude) float32 -90.0 -89.75 -89.5 -89.25 ... 89.5 89.75 90.0
* year (year) int64 1979 1980 1981 1982 1983 ... 2018 2019 2020 2021
Attributes:
units: K
long_name: Sea surface temperature

这里我计算了每一年的 DJF,然后发现 time 坐标变成了 year 坐标。想要把 time 添加回来的话,首先需要根据 dataset 中的 year 坐标生成类型为 datetime64[ns] 的时间数据。这里使用 pandas 中的 to_datetime 函数进行操作。

1
data_time = to_datetime(dataset['year'].values, format='%Y')

然后将这个 data_time 作为 year 的子坐标添加进 dataset 中。

1
dataset = dataset.assign_coords(time=('year', data_time))
time参数

这里的 time 形参表示添加的坐标名为 time,括号里 ‘year’ 为父坐标,data_time 是添加的坐标的数据

然后你就会看到 dataset 里出现了 time 坐标,只不过此时它还没有被使用。

1
2
3
4
5
6
7
8
9
10
<xarray.DataArray 'sst' (year: 43, latitude: 721, longitude: 1440)>
array()
Coordinates:
* longitude (longitude) float32 0.0 0.25 0.5 0.75 ... 359.0 359.2 359.5 359.8
* latitude (latitude) float32 -90.0 -89.75 -89.5 -89.25 ... 89.5 89.75 90.0
* year (year) int64 1979 1980 1981 1982 1983 ... 2018 2019 2020 2021
time (year) datetime64[ns] 1979-01-01 1980-01-01 ... 2021-01-01
Attributes:
units: K
long_name: Sea surface temperature

然后就使用前面提到的交换两个坐标的方法互换 yeartime,然后丢掉 year 就可以了

计算每一年的季节平均

今天在做数据的 EOF 分析,需要计算每一年中的 DJF 时间内的数据平均,突然发现 xarray 里面竟然没有现成的函数可以使用,但是如果我用循环来计算的话也太不优雅了,完全舍弃掉了向量运算的优势。经过思索以后,找到了如下的解决办法。


假定我们有如下的月平均数据 dataset,并已取出了月份为 D、J、F 的数据,舍弃掉了不完整的月份数据 (也即无法完整组成 DJF 组合的数据)。

1
2
3
4
5
6
7
8
9
<xarray.DataArray 'sst' (time: 126, latitude: 721, longitude: 1440)>
[130818240 values with dtype=float32]
Coordinates:
* longitude (longitude) float32 0.0 0.25 0.5 0.75 ... 359.0 359.2 359.5 359.8
* latitude (latitude) float32 -90.0 -89.75 -89.5 -89.25 ... 89.5 89.75 90.0
* time (time) datetime64[ns] 1979-12-01 1980-01-01 ... 2021-02-01
Attributes:
units: K
long_name: Sea surface temperature

既然 xarray 无法提供便捷的操作,这里我们就需要让思维跳出 xarray 的限制,采取的方法如下:取出 dataset 中数据对应的 numpy 数组,然后利用 reshape 将数据的维度重新划分,把第一个时间维打散成两个变成两个维度,一个是代表有多少组 DJFyear 维度,这个维度后面将转换成 time 维,一个是代表 DJF 中每个月的 DJF 维。这样,数据的 shape 将会由 (126, 721, 1440) 变为 (42, 3, 721, 1440),然后我们对第二个维度取平均,就能得出每一年内数据的 DJF 的 平均了。最后我们再利用得到的新的数据构造新的 dataset。具体步骤如下。


首先从 dataset 中取出数据的 numpy 数组

1
data = dataset['sst'].data

然后结合自己数据的大小对数据进行 reshape (因为我的数据原本的 time 维长度维 126,若以 3 为单位进行分组的话,126/3=42,因此数据最后的 shape 应为 (42, 3, 721, 1440)) 。

1
data = data.reshape((42, 3, 721, 1440))

然后对第二个维计算平均,得到我们想要的数据的 numpy 数组。

1
data = data.mean(axis=1)

最后构造出我们想要的 DataArray

1
2
3
4
5
6
7
8
9
10
11
# 由于我们没有改变经纬度,因此经纬度坐标直接使用原来的坐标即可
latitude = dataset['latitude'].data
longitude = dataset['longitude'].data
# 我们需要构造出新的时间坐标
import pandas as pd
import xarray as xr
time = ['{}-01-01'.format(x) for x in range(1980, 1980 + 42)]
time = pd.to_datetime(time)
# 构造新的 DataArray
dataset_new = xr.DataArray(data=data, name='sst', dims=['time', 'latitude', 'longitude'],
coords=dict(time=time, latitude=latitude, longitude=longitude))

array() 里的数据已省略

1
2
3
4
5
6
<xarray.DataArray 'sst' (time: 42, latitude: 721, longitude: 1440)>
array()
Coordinates:
* time (time) datetime64[ns] 1980-01-01 1981-01-01 ... 2021-01-01
* latitude (latitude) float32 -90.0 -89.75 -89.5 -89.25 ... 89.5 89.75 90.0
* longitude (longitude) float32 0.0 0.25 0.5 0.75 ... 359.0 359.2 359.5 359.8

Author: Syize

Permalink: https://blog.syize.cn/2022/10/16/learn-xarray-with-netcdf/

本博客所有文章除特别声明外,均采用 CC BY-NC-SA 4.0 许可协议。转载请注明来自 Syizeのblog

Comments